Saturday, July 8, 2017


So, I'm shocked to see that it has been over a month since last I blogged and I guess the best thing for me to do is to stop worrying about it, confess I don't seem to have a schedule, (retired, you know) and just send updates as they occur to me...this will save on what looks to be one apology after another.

However, today's blog is going to be filled with lots of activity and a big thank you to a favorite blogger!  Here we go:

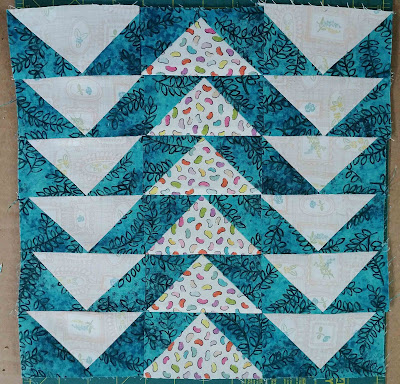
This is one of my latest finishes and is called A Circle of Flying Geese. It's original free pattern creator blogs at Piece By Number and also directed me to a lovely tutorial.  It was my first paper piecing project and not too bad once I got the hang of it!


The rest of today's makes come as a direct result of  me daily reading Caroline Fairbanks-Critchfield's blog SewCanShe.com .  I start every morning at her blog, after looking at the sales emails from a couple of online favorite stores and reading Mary Fons' Paper Girl site.  I don't make every single thing she (and her sister Beka) post but I do look to see if it is something I want to try.  The last few weeks have been filled with little bags and pouches and mini quilts which have caught my fancy.  If you'd like to make some of them or just get ideas from all around the web, stop by and see for yourself.  They have posted all kinds of tutorials, too.

Here are a few of things I've made recently:


This is my version of the February Candy Gram Mini Quilt.  It's about 8 1/2" x 4 1/2"


I also made a version of June's Square Dance Daisy.  It is a lot of applique and piecing and really captured for me the Summer Season.  It has been so rainy that it also helped brighten up the dark days, too.


This Fat Quarter Sized Fold-Up Basket was fun to make and (as you can see) has been quite helpful at holding all my left over scraps from other projects.  Hers did not have handles but after the project was finished this was a left over scrap and just cried out to be the handle.  And what to do with the little piece of ribbon left over from a stack of FQ's?  That's right - a bow on the basket, of course!


Next I tackled this Peek a Boo Pouch.  It is about 6"x 7" folded up and snapped. (Here it is leaning against my dove pincushion to get it's picture taken.)


Folded out, it has two vinyl pockets (the better to see through), one with a zipper.  Very useful for travel or just sitting in alternate sewing sites waiting to be used. (you know, the deck or by the TV.)

My final thing to share today is the Zola Zippered Pencil Box with snapped handle:


The pictures are a little difficult to see since I seem to be rectangular-ly challenged. But the zipper is 18" long and wraps around to the back of the box to snap and form a handle.  So cute.  When you open it, the sides pop into place and will hold all sort of gadgets and accessories (not just pens and pencils.)  See:


Anyway, the point is to thank Caroline and Beka for daily fun and lots of challenging projects to make.  Caroline also searches out the web to find projects that may not have instructions in order to figure out how to make them and pass the info along to her readers.  Thank You! 

If the rain holds off for a couple of days, I'll get to take a picture and post my latest completed flimsy. There may be an actual quilt on the way!   Debbie

Saturday, June 3, 2017

As you may have noticed, I took a couple weeks off from blogging.  Just one of those things.  However, I did not stop sewing things.  So, let me catch you up a little.

This is the Sewcial Bee Sampler Block #16 - King's Crown. It turned out a little wobbly.  But we move on...


This is Block #17 called Spools.  It is one of the borderless blocks. And, last but not the very last,


Block #18, Square Peg.  Just finished it up today.  To see the hundreds of other blocks that have been made go to Instagram #SewcialBeeSampler. To download all the blocks, go to Sharon Holland's blog and this week's giveaway from Lady Belle Fabrics is still open for entries at Maureen Cracknell's blogspot.


Now, when last we chatted, I was determined to make a Circle of Geese block as a mini quilt. The difficulty was that it is a paper pieced project and I'd never done that.  I spent the first day sewing and then patiently un-sewing the block.  By the third try I was no longer feeling very patient.  I decided to try again another day with my trusty little computer and the online tutorial.  If you're interested in trying this you can find the free block and tutorial by clicking here.


The next time I played with it (with computer beside the sewing machine) I finally got the hang of it and only had to un-sewed a couple of lines.  This is the template with 3 pieces sewn on.


Here's the other side and where the pieces are sewn to the template.  When 4 blocks were completed, it looked like this:


Time to sew it together and try quilting it on the machine.  We'll look at that next week.  Oh, and I also started but haven't quite completed full size quilt top.  Here's a sneak peak at some of the parts:


I think it will be all pieced by next week as well.  Have a lovely week and I hope we'll chat again next Saturday!

Saturday, May 13, 2017

Happy Saturday!  My week finally quieted down and I caught up with my Sewcial Bee Sampler Quilt Sewalong.  This is Block 14 and a reappearance of the long-eared lambs.  I'm still loving the Spring theme of these blocks.


My second one completed this week was Block #15 The Broken Dish.  It is a 6.5" block finished out to be a 12.5" unfinished block.  It was like taking a break. 4 half square trianges and we're done.

I continue to be in awe of Maureen Cracknell and Sharon Holland who are such busy quilters and designers and still make the time to create and lead this process.  Be sure to drop by Sharon's blog to sign up for this week's prizes!!

BTW,  block 15 means 3 of 5 rows are now complete.  I'll layout what I've sewn for you to see next week.


My next "can I do that?" project is a "Circle of Flying Geese" block and is a paper piecing project.  I'd love to show you pictures, however, the current answer to my question is, "No, not yet."  I get seriously challenged by the flipping and the spacial understanding of this process.  I read the directions and watched the tutorial and then went out to sew.  Next week I'll take my computer to the sewing room with me to do the tutorial step-by-step.  Maybe there will be better results!


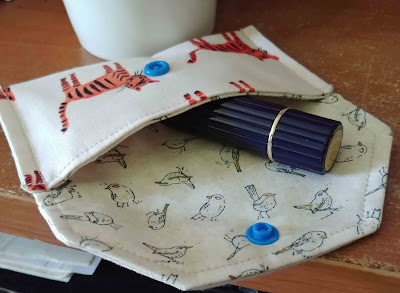
Meanwhile, there's always time for another tiny snap pouch for easy capture of that lipstick floating somewhere in the bottom of my purse.  These two fabrics just seemed destined to go together.  Hope you have a lovely rest of the weekend.  See you next Saturday.  Debbie

Sunday, May 7, 2017

Blooming Quilter's Blog Hop Week 4


Good Morning and welcome to the last week of the 2017 New Quilt Bloggers Blog Hop!  We've been spending time the last 2 months learning the ins and outs of designing, writing, arranging, and presenting our blogs to an audience.  The questions have abounded, from "how do I create my own look?" to "how do I get photos ready for the web?" right through to "what are the technical steps for using this blogger platform?"  It has been a very enlightening process and I am so grateful to the hosts of this process:
  
Yvonne from Quilting Jetgirl (My group leader!), 
Leanne from She Can Quilt, and 

These great mentors have been immeasurably helpful and reassuring as we discussed the do's and (maybe) don'ts of sharing our quilting and sewing experience with others in the quilting community.  Also, they have used their various ties to the industry that supports us to round up some wonderful prizes for our readers.  So, hop on over to their sites (links above) to read all about it and register to win this week's great giveaways.

About Me

Some of my earliest memories are about piecing on my grandmother's front porch with my cousins. I was about 8 or 9.  We made quilts for our dolls and though my grandmother had an early Singer machine, we were learning how to hand sew neatly in a straight line so the pieces would hold together.  I remember using odds and ends of her quilting stash and even piecing together batting scraps to use in the middle.

My Mom began to teach me to sew on her machine as I got older and we made doll clothes and eventually school clothes together.  When I graduated college and got married we gave away all the dolls and their accessories, hoping it would go on to be some other little girl's favorite things. We didn't think to take pictures and the internet was still nowhere in sight.  (Sigh.)

As the year's flew by I did all sorts of crafty things: knitting, crocheting, lots of DIY, beading, embroidery, cross stitch and dabbling all around working.  The last 26 years of my professional life were spent as the human resource person for an urban community services center which provided child care, youth after school programs, adult education, and various other services to an under-served community.  My last CEO was a crafty person herself and we were able to provide materials and classes for the community ladies in quilting and sewing.  Yay!  It was a great way to get to know community members and share the joy of using our creativity.  And still...no pictures.

It wasn't until retirement that I realized blogging could be fun.  I was reading a steady diet of quilting blogs and wanted to share what I was doing, too.  Since retirement in 2015, I've pieced several quilt tops (see Works in Progress) and now the challenge is to actually quilt them on my machine.  That will be my "Adventure" going forward.  Here are a few of my older pieces which were quilted by hand when my fingers would still do that!

This is the first quilt top I completed after retirement.  I did it for a co-worker who had been waiting for it for almost 2 years.  I did quilt it on the machine but only stitching in the ditch.  I love how the light shines through the batik pieces so it looks like stained glass.

Then there was a long line of "cheater" quilts which could be hand quilted at night in front of TV.


Dear Jane

Laurel Birch


The Roosters


12 Days of Christmas
For this one I fussy cut the pictures and pieced them together again and added my first Seminole border.

 The Christmas Goose is pieced and quilted.


If I have a masterpiece this is it.  My sunshine and shadow is about 20 years old and was hand pieced and quilted again in front of television.

My Best Tip
Measure, consult the directions, measure 2 more times - then cut. 
I'm a little math challenged!

I am so happy to be able to craft with fabric all the time now and hope you've enjoyed your time here. Cruise through the rest of my posts to see the little odds and ends I also enjoy sewing together and remember to check out the other members of this weeks Blooming Quilter's Blog Hop:


Danette from Lucky Quilts 


And don't forget to register for prizes at our host's sites.


Saturday, May 6, 2017

Good Morning, Saturday!  Today's block is #13 in the Sewcial Bee Sampler Quilt Sewalong.  And it is a doozie!  Flying geese everywhere!  I think my skills at this particular kind of piece are getting better-- Look at those points.  It's not perfect but it is the best I've ever done.  Thank you Maureen and Sharon for challenging me to do this.  I must say I had misgivings when I first saw the block.  I'll be posting Block 14 on Monday in conjunction with my week on the 2017 New Quilt Blogger Blog Hop! (More info later!)  You can sign up for some great Omnigrid prizes at Maureen's blog until Monday.  Don't miss the opportunity.


This week's project came from Blue Calla Creations and is a free pattern!  It is called The Clematis Wristlet.  The directions are quite specific and there are lots of pictures so it's just follow and sew.


Here are the pieces all cut out.  I hadn't actually used pattern pieces lately as most of my little projects have been made with squares or rectangles.  So, for me, cutting them out was a little challenging.  But I soon got the hang of it - okay, scissors are a great invention.


Here's the wrist strap all complete


And here's the completed little bag!  I finished it off with a piece of Riley Blake selvage from another scrap.  The blue chevron is one of hers and I thought the flowers were cute.  I may make it shorter though.  The wristlet is really just the right size for my wallet, keys, and lipstick for a fast getaway. (About 10" x 6.5")

You may have noticed this button on my sidebar:


It is the logo of a great session of conversations, tutorial information, and critiques in which I have been participating in since late February.  The sessions were leading up to a series of blog hops hosted by Yvonne @QuiltingJetgirl, Leanne @she can quilt and Beth @Cooking Up Quilts.  It has been a joy to learn some of the better techniques and disciplines to use as we blog. They have answered a million questions and gave me the courage to try new things and improve the look and feel of my blog.

Monday starts the last blog hop of this session and it is the one in which I get to participate.  I am a member of the Blooming Quilters "hive" (you can see our Button on the Sidebar, too) and Yvonne is my leader.  She'll post a list of all the bloggers for the week, as will I so that you can link up with all the new bloggers.  BYW, there will be prizes!!  I'll post early on Monday morning and give you all the information to join in the party.  Hope you enjoy.  Have a great weekend.  See you Monday, May 8th for the "Hop".


Sunday, April 30, 2017

Welcome to week 12’s block in the Sewcial Bee Sampler Sew-along...lots of 1/2 square triangles.   I haven’t pulled out all the blocks and looked at them together lately and as we progress to the middle of the quilt, I’m feeling like it would be a good time to see if the fabrics are well distributed.  Sounds like a project for this coming week.

Meanwhile, this week’s giveaway is a bundle of Sharon Holland’s new, beautiful fabric called Bountiful. Pop over to Maureen’s website this weekend to enter for the drawing.


You might recognize the box Block 12 is sitting in as it is the mystery project from March 25 finally completed. (That's Jasmine's tail in the upper corner.)  I wanted a place to store the Sewcial Sampler blocks and this is working well.   Many thanks to Yvonne at QuiltingJetgirl.com who sent me a design for the box which was a very effective solution.
The sides are a little too soft and  I was going to attach the lid, however, almost as soon as I set the top cover on the box,

Jasmine came to try it out as a napping spot and was quite satisfied.  The whole idea was to keep them flat and clean – so objective achieved!  Yvonne is one of the hosts of this year's 2017 New Quilt Bloggers group where we get advice and commentary on our blogs.  It has been a great experience and Monday will signal another week of the New Bloggers Blog Hop.  There are prizes and an opportunity to sample new quilting blogs and meet the bloggers.  Start at Yvonne's website on Monday morning!


I read SewCanShe.com everyday and Caroline posted a list of seven things you could easily make for the home.  Several were cute but I really felt I needed a new set of napkins.  I had a partial set of fat quarters from Riley Blake which were just the right colors, so I set out to cutting and pressing.  If you're interested, Find the instructions here .They are really easy and the way she handles the corners is super simple and makes a very crisp finish.  This one is ready to be sewn down either by hand or machine.  I did them on the machine.


The rolling rooster goes with my Pfalzgraff Pistoulet dishes and the new napkins make the perfect tail feathers!

I hope you have a lovely week.  Debbie


Saturday, April 15, 2017

Saturday night already?  Very fast moving week and while I didn't get everything done that I wanted to, we still made some progress.  For instance, this is Block 11 of the Sewcial Bee Samper Quilt.  I had fun getting the bunnies in the center. Thanks to Maureen Cracknell and Sharon Holland for their hard work and guidance on this project.


Jasmine's a little fuzzy in this picture but she is all in with this week's block, too.
The next project this week was to continue making cat mats for the Humane Shelter.  I used leftover 5" charms to use for the cat and yarn appliques. The cute cat is a pattern from the book called "Reminiscing: A Whimsicals Collection" by Terri Degenkolb.  I added the yarn ball on my own.  (See below.)


Jasmine was very curious about what these little cats were up to on their mats.


Meanwhile, the tulips are blooming and the grass is growing and tomorrow is Easter.  Hallelujah, He is Risen.

See you next week - and I will finish the mystery project this coming week.  Debbie

Saturday, April 8, 2017

Hello, Saturday!  This is Block 10 of the Sewcial Bee Sampler Quilt presented each week by Maureen Cracknell Handmade and Sharon Holland Designs.  I surprised myself when this block turned out.  Quarter Square Triangles sounded just too complex to work, but these are better than most of my Half Square Triangles.


Of course, I did receive Jasmine's two paws of approval this week - so how wrong could it go?

New Project - Kennel Mats!


A new friend from the 2017 New Quilt Bloggers, Sharon at YellowCatQuiltDesigns shared a post about making kennel mats for her local shelter.  We had purchased some items for the local shelter and when we dropped them off I had Lance check if they'd be interested in kennel mats and they gave him a very enthusiastic - YES!  The cats (and dogs) get to take their mats to their new home.  I'm hoping to make many more of these.


I've not done a lot of applique so when the blanket stitch left the pinked edges sticking out like claws it was a total accident.  But I love it and will try to do it on purpose next time.  Also did a little bit of straight line quilting with the walking foot, too.  It occurred to me this might be a good way to practice free motion quilting as well.  The mats are about 12" by 18" and I'm already planning the scraps for my next couple of mats. Thank you, Sharon, this is fun!

Practical Project Bags
Another Short Project


Bought the pattern for this on Craftsy after reading about sewing with vinyl and seeing similar bags online, but I really wanted serious directions rather than trying to figure it out as I went along.  The pattern was simple to understand, though fairly complex.  If you've put in a zipper before the only real challenge is sewing with the vinyl.


I did buy a teflon foot which worked pretty well but I ended up using the backing paper on the vinyl as tissue paper to keep the vinyl off the machine surface.  Anywhere it touches the metal, the vinyl sticks.  So, you're kind of doing a balancing act while trying to sew a straight line.  However, once you get the hang of it, the project moves right along.  This bag used an 18"x 10" piece of vinyl on front and back - so see through - And with a 17" zipper was about 18" square without the handle.  (Sorry for the fuzzy picture.) I used it immediately to store the materials for the Mystery Project which I'll finish up next week. Here's a picture of the empty bag, too.


I tried to get Jasmine to peek through the bag for me but she was taking a serious nap.  Sewing is very tiring for her some days. That's pretty much it for this week.  Join me next week to see how the Mystery Project Box is finished up.  Til then, take care and have a lovely week.  Debbie